Quizzes
CAST Files
CAST files can be found at
c://Program Files/UGS/NX 4.0/nxcast/parts/
I strongly suggest that you go through the reccommended CAST tutorials. They are very good and go into a lot more detail than the text.
UTEP Drawing Blanks
The UTEP drawing blanks, patterns and icons can be found at
c://Program Files/
We will use these when we cover drafting.
Lecture:
We will give an introduction to the class, go over the policies and grading, and start to give an introduction to NX.
Lab 1: Holiday (MLK)
Lab 2: Introduction to NX
We will give an overview to CAD, Solid Modeling and a brief demonstration of NX. For this class we will not be using the assigned text rather we will follow the a preliminary chapter in the text by Felix and Lee.
NX Lessons:
- Felix and Lee introduction
- Read Chapter 1 in Samuel, Pragada and Baksi
- Read and go through in front of NX, Chapter 2 in Samuel, Pragada and Baksi
Things you should be able to do and know:
- Open and close part files
- What are the steps in a Basic Modeling Procedure?
- Know what "Roles" do in NX
- Dynamically rotate, pan and zoom a model using the mouse.
- How to use selection filters
- What is the WCS?
Lecture:
This week we will
Lab 1: Fundamental Curves
In this Lab we learn how to use NX to draw basic curves on the screen. This is useful for basic layout work as well as for later on when we discuss sketch based operations
NX Lessons:
- Read and go through in front of NX, Chapter 3 in Samuel, Pragada and Baksi
- Read and go through in front of NX, Chapter 4 in Samuel, Pragada and Baksi
- CAST: Design -> Curves -> Basic Curves (90 minutes)
Things you should be able to do:
- How to draw basic curves freehand and with infered points
- Draw basic curves with specific dimensions
- Use trim and extend
- Know the diffrence between "dumb" and associative curves
- How to draw Helix
- How to draw a text curve
- How to delete and blank a curve
- How to change a curves appearance
- Can you answer all the Self-Test questions in Chapters 3 and 4?
Exercises:
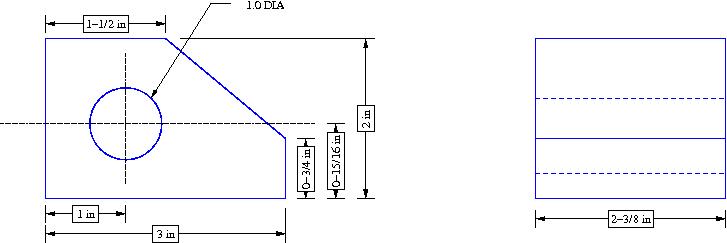
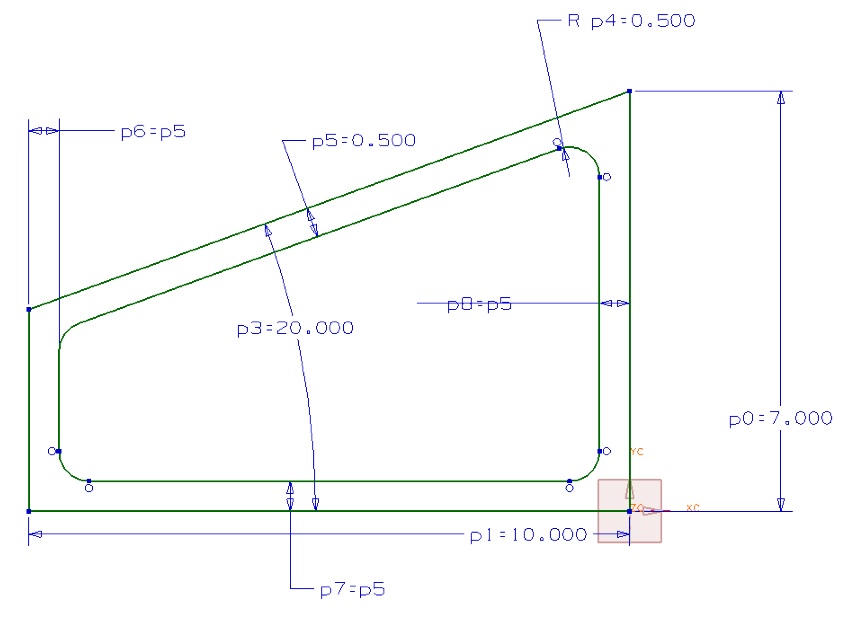
- Draw the following using the dimensions shown (draw only the blue lines). Use the correct color and line type.
Lab 2: Sketches
In this Lab we will introduce the NX sketcher. This will be used to create solid features by extruding and revolving. Also, we will start to learn about capturing design intent using sketchs and constraining them.
NX Lessons:
- Read and go through in front of NX, Chapter 5 in Samuel, Pragada and Baksi
- CAST: Design -> Sketcher -> Sketcher Basics (1 hrs)
Things you should be able to do:
- Enter Sketcher
- Fully constrain a sketch
- Constrain the sketch to the datums
- Use dimensions and constraints to constrain the sketch
- How to use the Miror Sketch feature
- Can you answer all the Self-Test questions in Chapter 5?
Lecture:
This week we will
Lab 1: Sketching and Design Intent
In this Lab further use the sketch feature and discuss the concept of design intent and how it can be implemented in Sketch.
NX Lessons:
- CAST: Design -> Sketcher -> Working with Sketches (2-3 hrs)
- CAST: Design -> Sketcher -> Constraining Sketches (1 hrs)
Things you should be able to do:
li>What is the function of inferred dimension icon?
- Define DOF.
- What feature operators use sketcher.
- Can you describe how to use the following constraints
- perpendicular
- parallel
- concentric
- tangent.
Exercise:
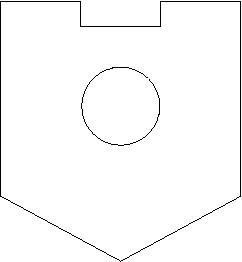
- Create a fully constrainted sketch of the following geometries
- Estimate the dimensions
- Modify some of your dimensions to make sure that the sketch behaves the way you think that it should
- Use constraints to capture the design intent that the hole is always centered horizontally and that the each segment on the top edge is of the same length in the first sketch.
- In the third figure all the thicknesses of the three legs of the E are equal and equal to the spacing between them.
Lab 2: Design Features
In this Lab start to cover design features. These are basic methods for creating solid models. They can be used as a base or as features that can be added to existing models.
NX Lessons:
- Chapter 6 in Samuel, Pragada and Baksi
Things you should be able to do:
- Extrude a Sketch into a solid
- Use the Draft Angle option in Extrude
- Revolve a Sketch into a solid
- Use the Block, Cylinder, Cone and Sphere Primatives as a base in your solid model
- Can you answer all the Self-Test questions in Chapter 6?
Lecture:
This week we will
Lab 1: Advanced Design Features
In this Lab we will focus some CAST tutoriasl to go a bit more in depth into some more advanced Design Features. Also we will discuss the various Positioning methods used in locating Design Features in NX.
NX Lessons:
- If you have not yet do it do Practice 6.7 in Samuel, Pragada and Baksi!
- CAST: Design -> Feature Modeling -> Extrude, Slot, Pocket (60 minutes)
- CAST: Design -> Feature Modeling -> Boss, Circular Array, Mirror Feature (60 minutes)
- CAST: Design -> Feature Modeling -> Combine Bodies, Pad, Detail Features (80 minutes)
Things you should be able to do:
- Understand how to use the various Positioning methods in locating design features.
- Horizontal
- Vertical
- Perpendicular
- Distance
- Point onto Point
- Point onto Line
Know the Three basic steps in defining a Design Feature
- Locate the face on which to construct the design feature (or pick the sketch)
- Define the Design Feature geometry
- Position the Design Feature on the face or plane.
Know how to use Circular Arrays
Know the difference between a counter bore hole, a counter sink hole and a straight hole.
Create a Block, and Cylinder primitive
Perform boolean operations on solids
Create a Pad Design Feature
Create a Boss Design Feature
Create a Chamfer, and Edge Blend
Create a Slot
Know how to fully position a Pad and Slot feature by 1) Horizontal, 2) Vertical, 3) Parallel, 4) Perpendicular, 5) Parallel at a Distance, 6) Angular, 7) Point onto Point, 8) Point onto Line and 9) Line onto Line.
Lab 2: Detail Features
This Lab we will cover some Detail Features in NX such as Edge Blends, Face Belnds, Chamfer, and Shell commands
NX Lessons:
- Chapter 7 in Samuel, Pragada and Baksi (Section 7.5 is optional)
- CAST: Design -> Feature Modeling -> Draft, Face/Surface Operations -> Draft (30 minutes)
- CAST: Design -> Feature Modeling -> Draft, Face/Surface Operations -> Body Taper (30 minutes)
Things you should be able to do:
- How to perform a Trim Body operation.
- How to perform a Draft and Body Taper operation.
- What is the difference between a Body Taper and Draft?
- What manufacturing operations typically require the use of Draft and Body Taper?
- Can you answer all the Self-Test questions in Chapter 7?
Exercises:
You should be able to do the following simple parts in NX.
Lecture:
This week we will
No labs today we will have the first quiz. Good luck!
Here is a list of some things that you might expect to see on the quiz
- Given a sketch be able to fully constrain it.
- Answer any of the Self-Test quesions in the text.
- Know how to perform the following features and operations in NX
- Sketch
- Extrude and Revolve
- Block, Cylinder and Sphere Primatives
- Hole, Pad, Boss, and Pocket Design Features
- Draft, Body Taper, Edge Blend and Champher Detail Features.
And be able to add them to an existing model or to start a new model.
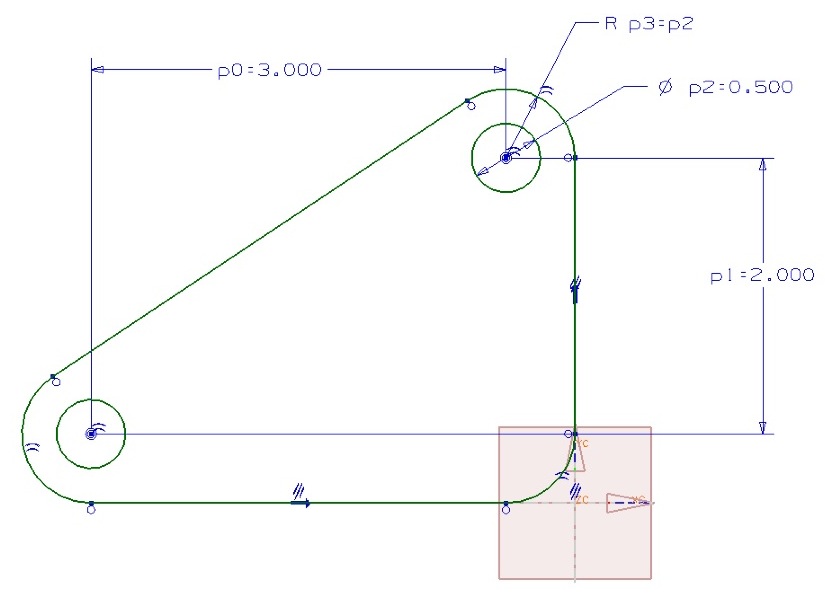
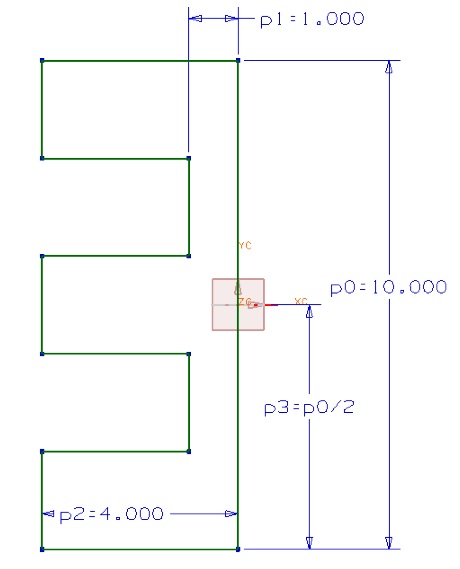
Lab 2: Expressions
In this lab we will look at hw expressions can be used to parametrically drive models and capture design intent.
NX Lessons:
- Chapter 11 in Samuel, Pragada and Baksi
- CAST: Design -> Expressions -> Creating Expressions (90 minutes)
- CAST: Design -> Expressions -> Using Expressions (30 minutes)
- CAST: Design -> Expressions -> Expressions Projects (60 minutes)
Things you should be able to do:
- Define variables in the Expressiosn window
- Use Expressions in defining you Design Features, Sketches etc
- Use the Expressions window to edit dimensions and expressions
Lecture:
This week we will
Lab 1: Reference Entities aned Layers
In this lab we will cover Dataum Axis, Points and Planes
NX Lessons:
- Chapter 12 in Samuel, Pragada and Baksi
- Chapter 14 in Samuel, Pragada and Baksi
- CAST: Design-> Feature Modeling -> Datum CS
- CAST: Design-> Feature Modeling -> Datums, Trim Body, Hole, Shell (there is some review here as well)
Things you should be able to do:
- Create datum axis, and planes
- Be able to use the bisector datum plane to create datum planes that are centered on a part.
- Understand the difference between associative and non associatve datums.
- How to use datums to position features and sketches
- How datums can help capture design intent
Exercises:
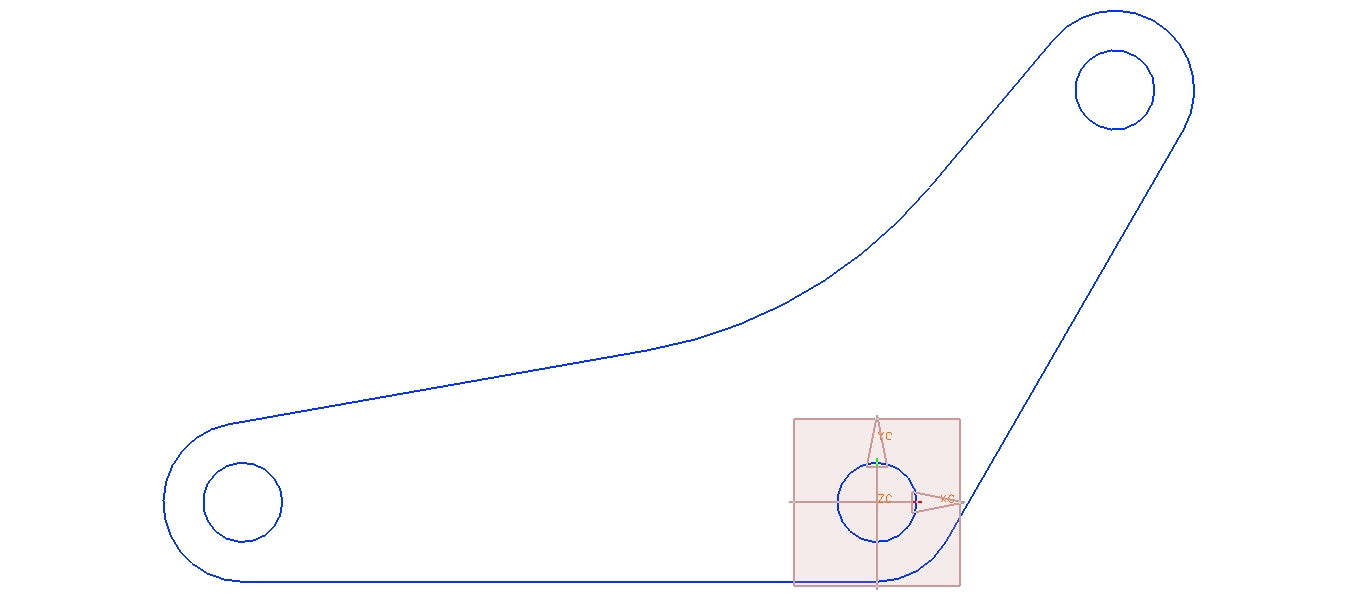
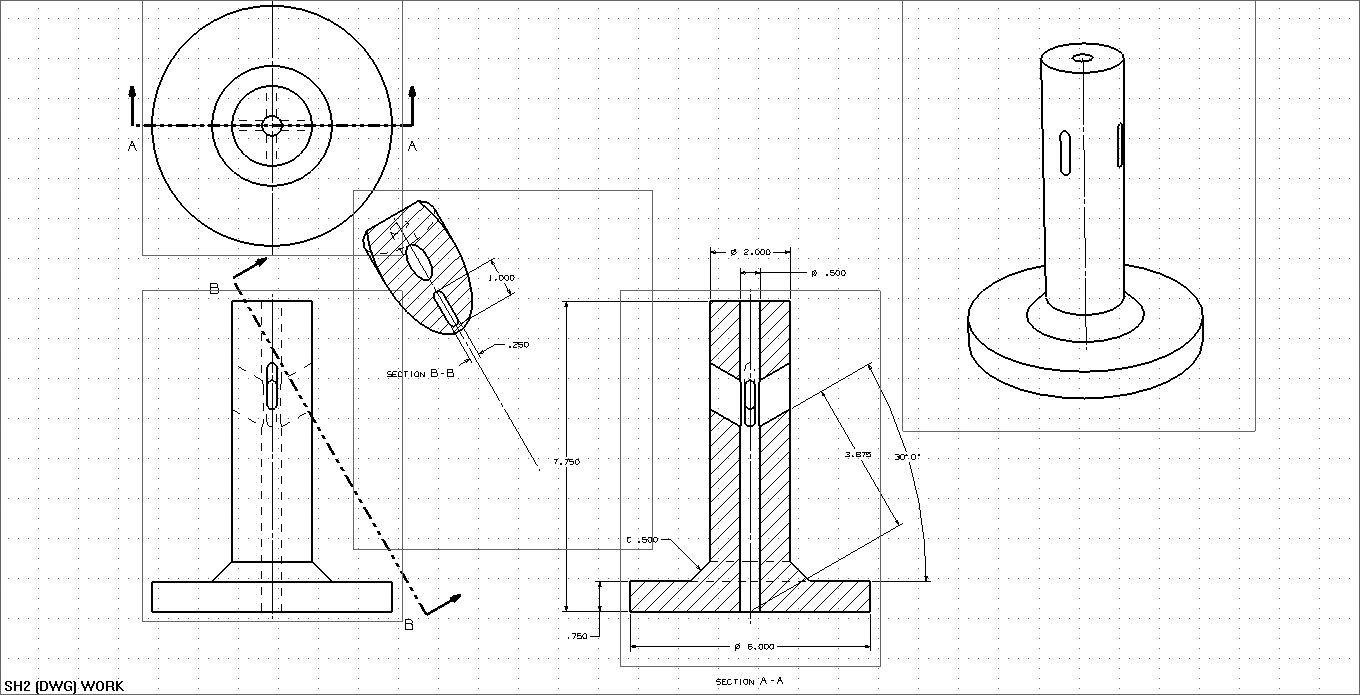
Try to model the following part. You will need to construct datum planes to sketch the slotted cuts shown in Section B-B. If you get on slot correct you can use a circular instance array to make the other three.
Lab 2: Feature Editing
We will look at how to edit features in your models
NX Lessons:
- Chapter 13 in Samuel, Pragada and Baksi
- CAST: Design-> Feature Modeling -> Editing Features
Things you should be able to do:
- Use the part navigator to edit features
- Be able to move features in the part navigator
- Modify feature parameters
- Modify feature positioning
Exercises:
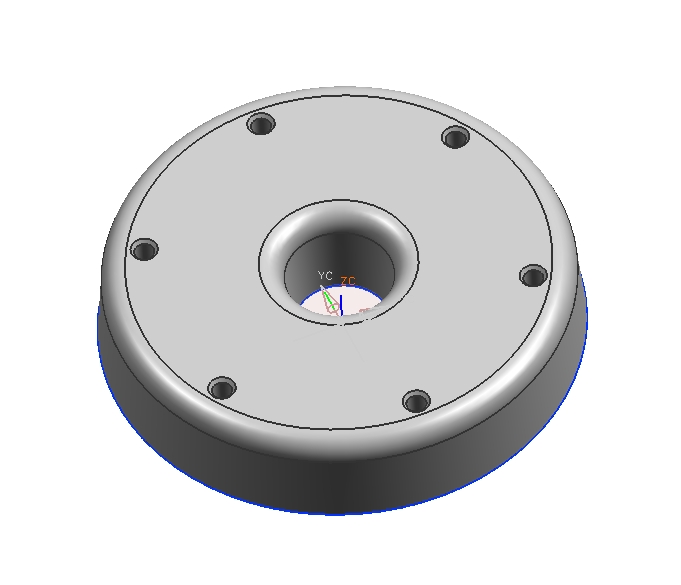
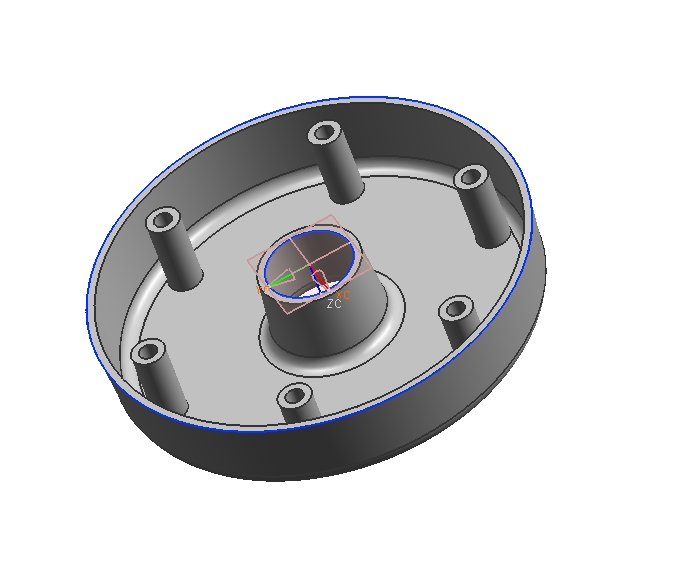
Download the following part (do a right click "save as", it is a part file) and do the following modifications
Modify the c'bore hole to be a c'sink hole.
Change the distance that the hole is fromthe center of the part to 2". Modify the rest of the part accordingly.
Use a circular array to create 6 equally spaced c'sink holes around the centerline of the part. They should all be c'sink holes identical to the origional one.
Add a R .25 edge blend to the top inner and outer diameter edges. Add this in such a manner that the wall thickness is constant at the edge blend.
Your final part should look as follows
Lecture:
This week we will
Lab 1: Practice Projects
This lab we will do some projects in CAST to give you more experience in using the various modeling techniques we have covered in NX in preparation for Wednesdays Quiz.
NX Lessons:
- CAST: Design -> Feature Modeling -> Feature Modeling Projects -> Creating a Mounting Bar (20 minutes)
- CAST: Design -> Feature Modeling -> Feature Modeling Projects -> Creating a Simple Collet (15 minutes)
- CAST: Design -> Feature Modeling -> Feature Modeling Projects -> Creating a Pivot Plate (40 minutes)
- Using approximate dimensions create a solid model that has all the features and basic shape of the parts shown below.
Lab 2: Modeling Projects I
In this lab we will do more of what we did last time
NX Lessons:
Work on practice model parts
Things you should be able to do:
- Be able to plan how a part is to be constructed.
Lecture:
This week we will
Lab 1: Modeling Projects II
We will practice modeling some parts without step-by step instructions. The trick here is to try and plan how your model will be constructed before you start to make it.
NX Lessons:
- None
Things you should be able to do:
- Be able to plan how a part is to be constructed.
Lab 2: Modeling Projects III
Keep on practicing!
NX Lessons:
- None
Things you should be able to do:
- Be expert at making individual parts. Even rather complex ones.
Lecture:
This week we will
No labs today we will have the second quiz. Good luck!
Here is a list of some things that you might expect to see on the quiz
Lab 2: Assembly Basics I
In this lab we will start to look at how to construct assemblies of parts in NX.
NX Lessons:
- Chapter 17 in Samuel, Pragada and Baksi
Review Questions:
- What is bottom-up assembly?
- What is a Reference Set?
- What is the Assembly Navigator?
- What is top-down assembly?
Things you should be able to do:
- Bottom-up assembly
- Understand how to use Mate, Align, Center, Parallel, and Distance contraints in Assembly
- How to edit in the assembly with "Work Part"
- How to edit with "Displayed Part"
- How to Reposition a part in Assembly
- How to edit Mating Constraints in an Assembly
- How to change a parts appearence (color, translucency and visability) in Assembly
- How to make an exploded assembly view
Lecture:
This week we will
Lab 1: Assembly Basics II
Today we will consider design in-place modeling or top-down assemblies where we will create parts in existing assemblies. This approach is typicall of the way more complex designs are engineered.
NX Lessons:
- Assembly Modeling -> Assemblies -> Basic Assembly Concepts (90 minutes)
- Assembly Modeling -> Assemblies -> Creating Assemblies -> Top-down Assemblies (60 minutes)
Review Questions:
- Understand how to use Angle, Perpendicular and Tangent contraints in Assembly
Things you should be able to do:
- Create new parts within an assembly
- Use WAVE link to link geometry from the assembly to the newly created parts.
Exercises:
Download the shaft assembly parts from WebCT and perform the following
Add a flat and step in shaft.prt so that the gear.prt is located exactly as we did in class. Model a set screw to fit here and add it to the assembly.
Add a c'bore hole in the pillow_block.prt so that teh bearing.prt fits inside. Assume that the bearing is held by a slight interferance fit.
Lab 2: Assembly Basics I (con't)
In this lab finish the previous CAST tutorials and start the assembly project
Exercises:
Continuing with the shaft assembly parts perform the following
Figure out some way to attach the pillow blocks to the base plate.
Make the design modifications to the pillow block and base plate parts so that this can be done. When finished all the parts needed in the assembly must be there. Including screws, nuts and thread features. All fasteners must be standard fasteners and proper clearance should be given.
Add all the parts for your final assembly to shaft_assembly.prt and have them constrained.
Lecture:
This week we will
Lab 1: Assembly Projects I
Today we will do some projects using assemblies in CAST. Again if you feel confident please try to do the major steps on the tutorials will on your own. If you get stuck you can refer to the detailed steps in CAST. Also, we will get you started on an open ended assembly project that will be continued in the next lab.
NX Lessons:
- Assembly Modeling -> Assemblies -> Positioning Assembly Components (60 minutes)
- Assembly Modeling -> Assemblies -> Assembly Projects -> Creating a Clamp Assembly (15 minutes)
- Assembly Modeling -> Assemblies -> Assembly Projects -> Creating a Phone Assembly (10 minutes)
- Assembly Modeling -> Assemblies -> Assembly Projects -> Working with an Automotive Assembly (15 minutes)
- Assembly Modeling -> Assemblies -> Assembly Projects -> Creating an Assembly Sequence (15 minutes)
Review Questions:
-
Things you should be able to do:
Lab 2: Assembly Tricks I
In this lab we will cover some more advanced engineering inquiries that can be done with Assemblies in NX
NX Lessons:
- Assembly Modeling -> Assemblies -> Creating Assemblies -> Bottom-up Assemblies (30 minutes)
- Assembly Modeling -> Advanced Assemblies -> Assemblies Weight Management (60 minutes)
- Assembly Modeling -> Assemblies -> Clearance and Analysis (60 minutes)
- Assembly Modeling -> Assemblies -> Sequencing and Motion (60 minutes)
Review Questions:
-
Things you should be able to do:
Lab 2: Assembly Projects II
In this lab we will continue the assembly project from the previous lab.
Review Questions:
-
Lecture:
This week we will
Lab 1: Introduction to Drafting
In this lab we will do some tutorials in NX Drafting.
NX Lessons:
- Chapter 18 in Samuel, Pragada and Baksi
Things you should be able to do:
- Add section and auxiliary views to the drawing sheet.
- Modify the view style so that hidden lines are shown in the view.
- Modify the view style so that smooth lines are or are not shown.
Lab 2: Dimensioning Basics
Here we will cover some basics of dimensioning. Again CAST assumes that you know this already and many of you may. We will not go into all the details of the dimensioning standards since NX (and most modern CAD systems) will automate this process. As an engineering it is not essential that you are and expert in all the drafting standards but more what is a fully dimensioned drawing and how the dimensioning and tolerancing affects the design and the part manufacture.
Lecture Notes:
- Dimensioning and tolerancing
NX Lessons:
- Drafting -> Linear Dimensions (90 minutes)
- Drafting -> Radial Dimensions (90 minutes)
Review Questions:
- How is a linear dimension specified in a drawing?; how is an angular, radial and diametric dimension sepcified in a drawing?
- What is a center line, dimension line, object line, and hidden line?
- What information does the number of decimal places in a dimension convey?
- How do you specify explicitly specify a tolerance in a dimension?
Things you should be able to do:
- Fully dimension a simple part
- Append the dimension text to add notes such as TYP of PLCS.
- Modify a dimension so that the arrows are inside or outsde the dimension extension lines
- Modify the text location in a dimension.
Lecture:
This week we will
Lab 1: Title Blocks and Tolerencing
In this lab we will look at some CAST tutorials on some finishing details of creating an engineering drawing.
Also please look at how to insert the UTEP title blocks, text and notes into your Drawing Sheets
NX Lessons:
- Drafting -> Additional Drafting Symbols -> Thread Symbols (30 minutes)
- Drafting -> Additional Drafting Symbols -> Weld Symbols (30 minutes)
- Drafting -> Notes and Labels -> Creating Notes (30 minutes)
- Drafting -> Notes and Labels -> Creating Labels (30 minutes)
- Drafting -> Plotting Drawings (60 minutes)
Things you should be able to do:
- Create thread and weld symbols
- Add the UTEP drawing patterns, text and notes
- Add notes and labels
Lab 2: Drafting Projects I
This week we will give you a little more experience in producing engineering drawings in NX.
NX Lessons:
- Drafting -> Drafting Projects (90 minutes)
- Start with dimensioning the following parts. This will be submitted and graded as another project for this class.
Lecture:
This week we will
Lab 1: Drafting Projects II
In this lab we continue with the practice parts from the prior class. Tolerance your drawing so that it is functional. Use the title blocks in C://
Lab 2: Final Project
In this lab we will work on the final projects
Lecture:
This week we will
Lab 1: Final Project
In this lab we will work on the final projects
This quiz will be in class and consist of two parts a short answer section based on the Review Questions from prior Lectures.
In lieu of a final exam we will have a fourth quiz which is optional. The three highest quiz grades will be taken to form your final grade. If you feel that you did "good enough" on the prior three quizzes you do not need to take this. It will be cumulative.
Go back to the main page or the top